June 25, 2026
·
8 min read
How to Set Up Testimonial Management Software: 9 Agency Steps
A practical checklist for setting up testimonial management software in an agency—define success criteria, map collection workflows, choose the right platform, structure data for reuse, configure permissions, and build compliant intake and consent.
Testimonials are easy to collect until you need to find the right quote, prove consent, or get approvals quickly. Then they turn into scattered docs, endless Slack threads, and “who has the latest version?” moments.
This checklist walks you through a clean setup that your whole team can follow. You’ll define what “usable” means, map requests and follow-ups, pick software that fits agency reality, organize fields and tags for retrieval, lock down roles, and capture consent so testimonials are publish-ready when you need them.
Define success criteria
You need one shared target before you configure anything. A clear definition of “usable testimonial” prevents endless back-and-forth.
Create a one-page success brief with three parts: what qualifies, who approves, and what “done” looks like. Keep it visible in your project hub.
If you can’t point to the brief, you’re running on opinions.
Testimonial definition
Define what “usable” means so collection doesn’t turn into cleanup work.
- Client name
- Role and company
- Service or engagement
- Outcome statement
- Permission and consent
Add usage channels to the same record, or you’ll lose rights later.
Approval owners
Pick owners now, not when the first testimonial lands in the inbox. Each handoff needs one accountable person.
- Request owner: sends asks, follows up
- Consent owner: verifies permission, stores proof
- Brand owner: checks tone, edits lightly
- Publish owner: final go/no-go
When owners are unclear, testimonials stall in “almost ready” forever.
Scope and timeline
Start small so the workflow survives first contact with reality. Set a first deadline so your team has a forcing function.
Imagine a rollout limited to one service line and one website section. Set a first collection deadline tied to a real publishing moment.
Your “done” checklist should include: required fields complete, permission logged, approval recorded, and a live placement link. If anyone can’t verify those items, it isn’t done.
Map collection workflow
Map the full path from ask to published asset so requests stop relying on memory. A single-page swimlane keeps Sales, CS, and Delivery aligned—especially if you’re using a system that carries a testimonial from request through approval to a live placement (e.g., ShowTrust).
Build it around five moments: trigger, request, consent, capture, publish. If anyone can’t point to “what happens next,” your workflow isn’t real.
Intake touchpoints
Pick your ask moments so testimonials arrive when value is freshest. Fewer touchpoints, used consistently, beats constant ad‑hoc requests—and it’s easier to stay consistent when the ask is a simple shareable link your team can reuse across moments.
Project milestone: after a measurable deliverable lands.
QBR: when goals and outcomes are reviewed together.
Offboarding: when the relationship ends cleanly.
Renewal: when commitment is reaffirmed.
After a win: when a launch or save happens.
Your best touchpoint is the one your team will actually run every time.
Request templates
Templates remove friction and reduce “I’ll write it later” delays. Create one set per channel, with the same structure and consent—and keep the experience consistent by routing responses into the same place for review and reuse (for example, a testimonial tool like ShowTrust that supports a form/link and approval workflow).
- Write one ask per channel: email, form, SMS.
- Add 3 prompt questions, tailored to the engagement.
- Include a short consent line covering use across channels.
- Add two CTAs: “Approve quote” and “Book 10‑minute call.”
- Store templates where your team works, not in a doc.
When the default is easy, clients respond without negotiating the process.
Follow-up cadence
Follow-ups work when they feel respectful and predictable. Set a cadence and stop rules so your team doesn’t improvise—and make sure whoever owns the process can quickly see status (sent, opened, replied, approved) without chasing threads.
- Send the initial request within a planned touchpoint window.
- Follow up once after a short gap, with fewer words.
- Follow up a final time, offering an even easier option.
- Stop after the final touch, unless the client re-engages.
- Stop immediately if they decline or go unresponsive post-renewal.
The goal is replies, not persistence that burns goodwill.
Escalation path
Stalled requests need a clear owner, or they die quietly. Define who escalates, when, and what “exception approved” looks like—especially when consent or publishing approval is the blocker and the asset can’t be used until it’s formally approved.
Client success should own the first escalation, since they hold relationship context. Use leadership only for high-value accounts, sensitive situations, or legal consent questions.
If escalation feels awkward, your intake timing is probably wrong.
Select the software
You’re picking a system your team will live in daily. So compare tools against your requirements and constraints, then decide with a clear paper trail.
Must-have features
Start with non-negotiables, not vendor demos. Your shortlist should only include tools that cover the full testimonial lifecycle.
- Capture forms and import options
- Consent tracking and proof storage
- Tagging, fields, and segmentation
- Search, filters, and saved views
- Approvals workflow and embeddable widgets
If a tool misses one, it’s not a “maybe.” It’s a no.
Security checks
Your clients will assume you’ve vetted risk before any rollout. Confirm the basics early, or you’ll relitigate the decision during procurement.
Check for SSO support, plus role-based access controls for editors, approvers, and viewers. Validate data retention options, export formats, and what happens on cancellation. Map compliance needs to your client reality, including audit logs and data residency if required.
If security is fuzzy, implementation will stall at the first enterprise client.

Agency fit scorecard
Use a lightweight scorecard so the decision is repeatable across accounts. Weight criteria to match how your agency actually delivers.
| Tool | Time-to-launch | UX | Automation | Cost | Flexibility |
|---|---|---|---|---|---|
| Tool A | High | Medium | Medium | Medium | Low |
| Tool B | Medium | High | High | Medium | Medium |
| Tool C | Low | Medium | High | Low | High |
Pick the winner, then save the scorecard in your project folder. That document becomes your shield when preferences start creeping in.
For a concrete example of what “approvals workflow and embeddable widgets” can look like in practice, see how to embed my Wall of Love.
Set up data structure
Your software only works if your data is findable later. Build a clear schema so every testimonial becomes searchable, reusable, and safe to publish.
Treat this like a content model, not a folder system. Once the schema is finalized in the tool, your team stops “hunting” and starts shipping.
Core fields
Decide the fields first, because tags can’t save missing metadata. You’re building enough structure to search fast and reuse confidently.
- Client name and brand rules
- Service line and offering
- Industry and segment
- Deliverables and scope
- Proof points and claims notes
If a testimonial can’t be filtered by these, it will get ignored when deadlines hit.
Tags and filters
Tags should answer, “Where can this be used?” Define rules so two people tag the same quote the same way.
- Create a controlled list for persona tags.
- Add funnel stage tags used by your sales and marketing.
- Define objection tags as problem statements, not solutions.
- Add channel tags based on format limits and tone.
- Write a one-line tagging rule for each tag group.
When tagging is consistent, your library becomes a targeting engine, not a quote dump.
Naming conventions
Names are your backup search system when filters fail. Standardize titles, file names, and versioning so “latest approved” is never a debate.
Use a simple pattern like: Client–Service–Outcome–Date–Status. Then lock it in with required fields or automation where possible.
If you don’t enforce naming, you’ll rebuild trust one broken link at a time.
Configure roles and permissions
Least-privilege access keeps testimonials moving without turning your platform into a free-for-all. You’re building approval gates that match how your agency actually works.
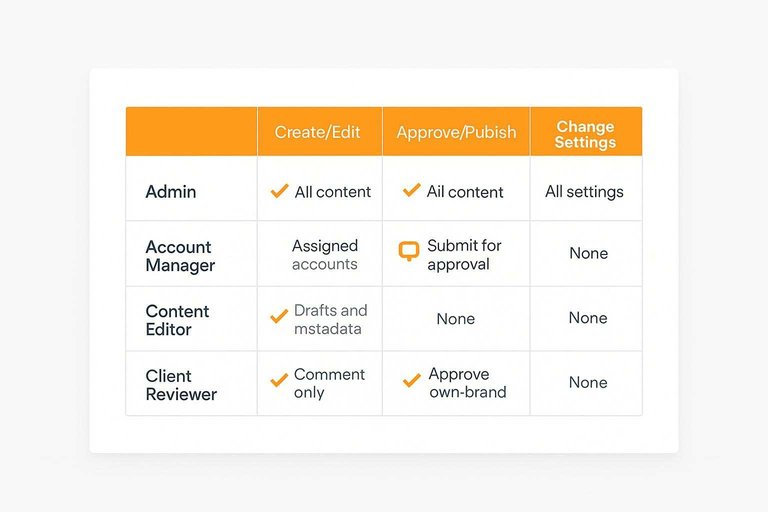
Use this role matrix as your starting point, then map each row to real users and groups—especially if you’re implementing advanced approval and organization workflows.
| Role | Can create/edit | Can approve/publish | Can change settings |
|---|---|---|---|
| Admin | All content | All content | All settings |
| Account Manager | Assigned accounts | Submit for approval | None |
| Content Editor | Drafts and metadata | None | None |
| Client Reviewer | Comment only | Approve own brand | None |
If two people can “change settings,” you don’t have governance. You have luck.
Build intake and consent
Your intake link is where testimonials become usable assets, not risky screenshots. Build it to capture the words, the attribution, and the permission in one pass.
Form layout
A short form increases completion, but you still need depth when a client is motivated. Structure the form so the essentials are required, and the story is optional. If you need a starting point, use automated testimonial collection forms to standardize the flow.
- Collect basics: name, role, company, email.
- Ask for a one-sentence testimonial first.
- Add optional prompts: problem, process, outcome, favorite detail.
- Offer attribution choices: full name, first name, initials, or anonymous.
- Include a preview of how attribution will appear.
Design for speed first. Depth is a bonus you earn.
Consent capture
Consent is not a vibe. It is a record.
Add checkboxes that explicitly cover where you can publish, how long you can use it, and whether you can lightly edit for clarity. Store the timestamp, the page URL, and the submission source automatically.
When someone asks later, you won’t debate. You’ll point to the proof.
Media collection
Strong testimonials are easier to trust with a face, logo, or clip. Make uploads simple, but tightly defined.
- Allow headshot uploads with size and aspect guidance.
- Accept common image formats like PNG and JPG.
- Accept video formats you can actually process.
- Require confirmation they own rights to the media.
- Ask for logo usage permission separately.
Assets without releases are just files. Treat them like liabilities until proven otherwise.
Launch the system—and make it stick
- Pilot with one client and one use case (e.g., case study quotes) to validate fields, tags, approvals, and consent before rolling out agency-wide.
- Document the “one true workflow”: where requests start, who approves, how follow-ups run, and what qualifies as a publish-ready testimonial.
- Train by role, not by tool: sales/rev ops on requesting, account teams on chasing approvals, marketers on tagging and reuse, admins on permissions.
- Set a monthly hygiene rhythm to de-duplicate entries, enforce naming conventions, and review access so the library stays searchable and compliant.
Operationalize Social Proof Fast
Once you’ve mapped workflows, permissions, and consent, the real challenge is collecting and publishing testimonials consistently without adding admin overhead.
ShowTrust helps agencies request, approve, and organize testimonials in one place, then showcase them via widgets or a public wall to turn feedback into conversion-driving trust signals.
Written by
ShowTrust
Notes from the ShowTrust team on collecting testimonials and building authentic social proof.
Share: